")
- June 13, 2024
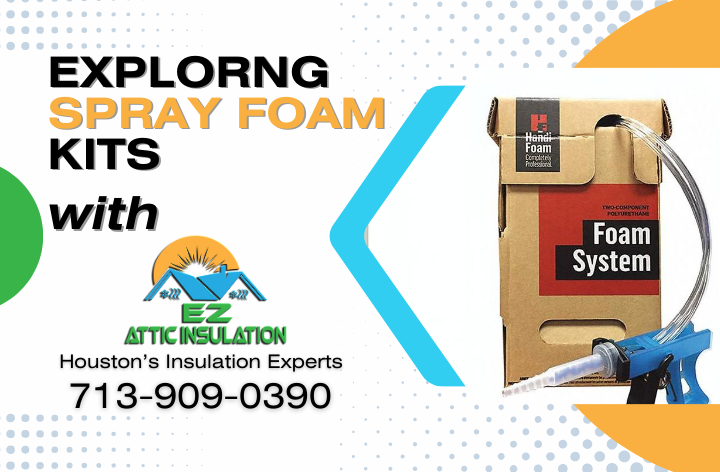
Exploring Insulation Options: Spray Foam Kits
Are you looking for a cost-effective and efficient way to insulate your home? Spray foam insulation kits have become increasingly popular among DIY enthusiasts looking to tackle insulation projects themselves. But who are we want to talk about them?
We are EZ Attic Insulation, Houston’s Insulation Experts. We’ve seen thousands of attics and homes over our decade long tenure. We’ve worked with multiple types of insulation, and have experience with these kits ourselves.
And that’s why in this blog post, we’ll be taking a look at spray foam kits, exploring their components, benefits, and a step-by-step guide to help you achieve optimal results. But first let’s address the obvious…
What is a Spray Foam Kit?
A spray foam kit is a self-contained insulation system that allows homeowners to apply insulation themselves. These kits provide a convenient and cost-effective solution for DIY insulation projects. You can take a look at various options for sale here.
Chemical Components
Spray foam kits typically include two chemical components: an isocyanate and a polyol blend. When mixed together in the proper proportions, these components create an expanding foam insulation material. The isocyanate acts as a hardener, while the polyol blend serves as the resin, providing the insulation’s structure and flexibility.
Kit Materials
Spray foam kits come with a dispensing gun, hoses, and nozzles that allow for precise application of the insulation material. As the two components mix in the nozzle, a chemical reaction takes place, causing the mixture to expand and harden, creating an effective insulation layer.
Limitations and Concerns
We want to take a moment to note that while spray foam kits offer a convenient DIY solution, they also have limitations. Proper application requires careful preparation, safety precautions, and an understanding of the material’s expansion properties. Overspraying or applying too much material in one area can lead to uneven insulation, poor adhesion, and wasted product.
This said, let’s move on to a step-by-step guide that will help you achieve the best results when tackling your spray foam insulation project.
Step-by-Step Guide to DIY Spray Foam Insulation
If you’re considering DIY spray foam insulation, follow these five key steps for the best installation experience:
Step 1: Assess Your Project Scope
Assessing the scope of your project is the first step to spray foam insulating yourself successfully. Start by identifying the areas where insulation is needed, such as walls, ceilings, and areas around doors and windows. DIY spray foam insulation is more suitable for smaller projects.
If you decide to proceed with this approach, consider using closed-cell spray foam kits, designed for convenient use and can cover up to 600 square feet with an additional 200 square foot pack.
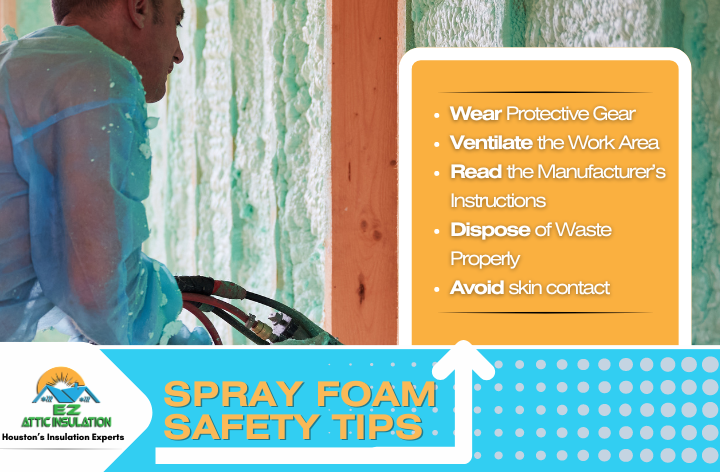
Step 2: Prepare Your Safety Gear
To ensure your safety while spray foam insulating yourself, properly prepare your safety gear.
Before starting the project, we reccommend you have the following items:
- A hooded suit
- Gloves
- A face mask
- Eye protection
These items are generally for protecting your face and skin from the irritants found in spray fam insulation.
Have a look below at some quick safety tips from EZ Attic when it comes to doing your DIY spray foam work:
Step 3: Temperature Considerations and Equipment Use
Once you have properly prepared your safety gear, the next step in spray foam insulation is to consider the optimal temperature and equipment use.
Ensure the temperature is within the recommended range of 75-85 degrees Fahrenheit for spray foam application. The surface temperature should also be around 70 degrees for optimal adhesion and curing.
Regarding equipment, using a reliable dispensing system like a spray foam gun and hose assembly is highly recommended. We recommend using systems with color-coordinated hoses and tips, making identifying and switching between different foam types easier.
Step 4: Start Ceiling Insulation with Spray Foam
To start insulating your ceiling with spray foam, shake the foam kit to mix the components thoroughly. Attach the spray nozzle to the canister and test it to ensure it’s working properly.
Start spraying the foam consistently and evenly, moving across the ceiling in side-to-side motion. Apply the foam in thin layers, building up gradually to achieve the desired thickness. Avoid spraying too much foam in one area, which may cause uneven insulation and waste products.
Work efficiently and quickly to prevent the nozzle from clogging. Once the first coat is applied, allow it to cure before applying the second coat if necessary.
Step 5: Insulate Walls with Spray Foam
Begin spraying the foam by holding the applicator gun about 10-12 inches from the wall surface. Move the gun in a sweeping motion to ensure even coverage. Don’t forget corners, edges, and hard-to-reach areas. Work your way from the bottom to the top of the wall, filling the cavities evenly.
Once the foam insulation has cured and properly expanded, cut away any excess foam with a foam cutting saw or utility knife. It will give the walls a neat and finished appearance.
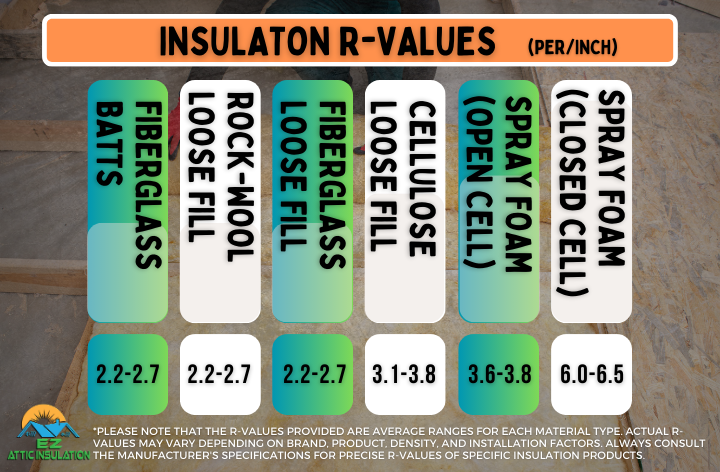
A Note on Spray Foam’s R-Value
As Insulators, we throw around this term a lot. And in your trip to the hardware store in the insulation isle, you may have seen this phrase tagged on several bags of new insulation. But what is it?
R value is a measure of an insulation material’s resistance to heat flow. The higher the value, the better the insulation performance.
And if you’re looking to insulate an area to get the best, you’re definitely on the right track if you’ve chosen to use a spray foam kit. This is because spray foam insulation, particularly closed-cell spray foam, offers one of the highest values per inch of thickness.
Choosing Between DIY and Professional Insulation
We do want to close on this thought on owner-completed projects: While spray foam kits provide a DIY insulation option for many prepared homeowners, professional insulation services offer several advantages:
- Expertise and experience
- High-quality equipment and materials
- Proper safety measures
- Efficient and effective installation process
- Comprehensive warranty and after-sales support
- AND no insulation mess on your hands!
So if you’re considering professional insulation services in Houston, EZ Attic Insulation is your trusted partner. Their team of certified insulation experts offers a wide range of services, including attic insulation, wall insulation, and crawl space insulation. We’d love to make your insulation project a reality!
Get Professional Spray Foam
Spray Foam Kits offer a great option for DIY insulation for homeowners, but wouldn’t you rather trust the pros?
